Showing posts with label homeschool. Show all posts

Friday, April 8, 2016

Playing with Poetry


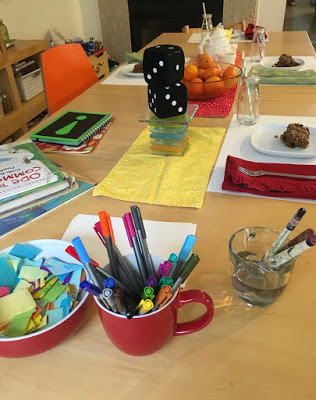
It was a mad tea party for breakfast today! It is our last week of an amazing poetry class from Brave Writer, and one of the lessons involved alternative forms of poetry. I devised two new forms to play with this morning, as it can be a little hard to inspire the desire to work on writing when it's 8o degrees outside. Baked oatmeal with chocolate chips doesn't hurt, either.

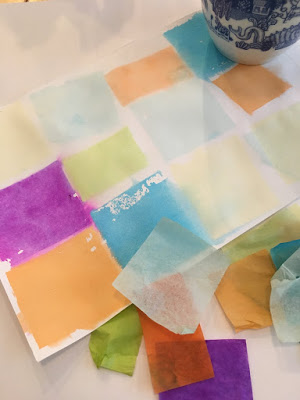
We started with a little art project. We used plain water to wet a small piece of heavyweight paper, then added a squares of colored tissue paper, with a little more water brushed on top.
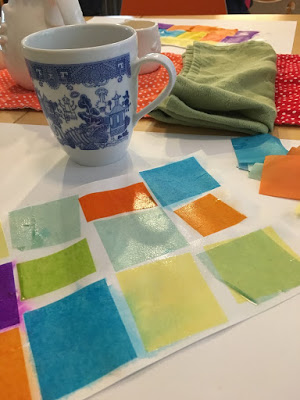

When it was dry, we took off the squares to reveal the colors that had bled onto the paper.
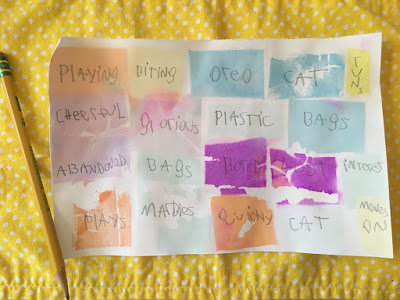
I assigned a part of speech to each color, and we ended up with two colors being nouns, two adjectives, one verb and one the choice of adverb or verb. The result:
It was challenging at times to come up with a word that fit the poem and parameters, so for younger kids I would probably have a jar of nouns, verbs, and adjectives that they could choose from to help compose their poem.

Our second poem was a bit of a game. I had a pair of large stuffed dice (bigger is better when you play!) that determined the number of lines and syllables for the poem. First, I had them roll one die to determine the number of lines for the poem. Next, they used both dice to decide the number of syllables for each line. So for the first poem, Max rolled a five for five lines. Then he rolled the dice five times to determine the number of syllables for each line. Of course you can use regular dice, but the stuffed dice can be thrown at the wall, the window, or rolled across the floor, which is much more fun than the table.

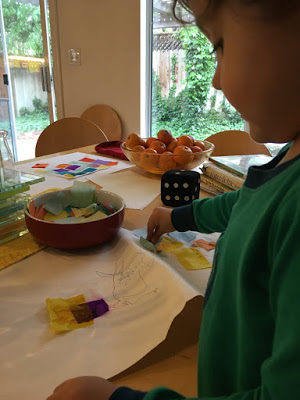
Both of the kids reported that they enjoyed creating poems this way, and even the three year old tried his hand at it. Well, it actually turned into a "Super Mario course with buildings and crocodiles", but we never know where a poem will lead us, do we?

April is National Poetry Month, and there are two fabulous resources to celebrate with your kids. The Academy of American Poets has many resources for parents and teachers, including a free poster and a list of 30 ways to celebrate. Julie Bogart and her team at Brave Writer have created a fabulous new site celebrating poetry tea time and the family. There are poet interviews, recipes, ideas and resources, and right now there is also a contest! Check out #poetryteatime and #PoetryTeaTimeContest on Instagram for inspiration, and don't miss the site, poetryteatime.com


Sunday, February 21, 2016

Klee Art Projects

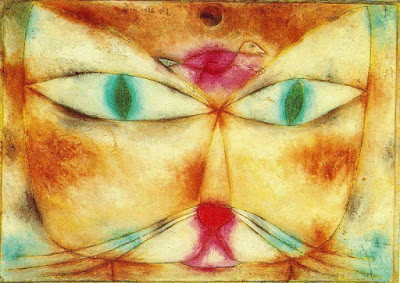
Paul Klee was a Swiss painter who spent most of his life living in Germany. He was a talented musician as well, and often tried to capture the feeling of musical rhythm and movement in his paintings, especially his abstract color studies. Klee explored balance, geometry and color, and the warm red, yellow and orange colors he experienced on a trip to Tunisia show up in much of his work.

The first work we'll explore is Cat and Bird. This is a great example of balance versus symmetry in art. The cat's face is not symmetrical (exactly the same on either side), but it is balanced. If you divide the composition into thirds, either horizontally or vertically, you can see that there is a point, counter point or weight to balance the planes. This could definitely lead to some math work in symmetry or fractions, homeschool moms!

Point out to your kids that the face is composed of two tear drop shapes that overlap in the middle like a Venn diagram (oh, that math again!), with a u shape for the mouth and that same tear drop shape, pulled out on either side, for the eyes. Add a heart nose, whiskers, and whatever is on the cat's mind! Trace over your picture with Sharpie, then erase the pencil lines.


We did our pictures with chalk pastels, choosing three colors for the cat's face and a few additional for the background. The key to working with pastels is blending and layering, blending and layering.

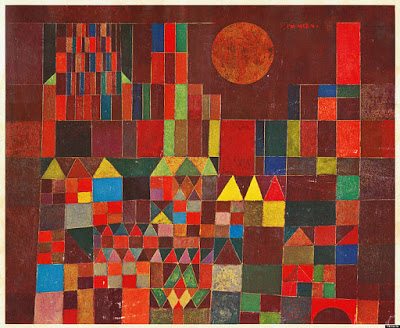
Our next project was inspired by Castle and Sun.


In this painting, Klee works with more rigid geometric shapes, appropriate for a strong castle. You could have your kids draw a castle free hand, with a ruler, or even pull out classic wood blocks and trace around them. Once they have a satisfactory castle, trace with Sharpie and erase the pencil. Make sure you use a waterproof ink to trace with, not Crayola markers!

Next, wet the paper with a brush dipped in water and apply squares of colored tissue paper, then go over the tissue once more with a wet brush. The dye from the paper will bleed onto the paper after a few minutes. Please test your tissue ahead of time - some papers have fixative that prevents bleeding, and some colors are so light that they don't leave much on the page.


After a few minutes, remove the paper and it looks like watercolor!


Since Klee uses such strong, identifiable geometric shapes, this is a great project to do with a geometry unit!

The last project is inspired by the painting Senecio. In this painting, Klee combines the organic, balanced elements from Cat and Bird with the hard geometry of Castle and Sun. 


We followed the same steps as above with drawing in pencil then Sharpie, tracing a paper plate for the head and adding a center line to divide the face and aid with drawing in the features. Next, grab an old gift card or one of those fake credit cards that come in the mail, and a little tempera or acrylic paint. Load a little on the edge of the card and scrape it down the paper.


Create the background the same way, then cut out the face and glue it on your background:


Max chose to color his face with oil pastels instead. I must say that I have not been inspired by the kid's art books about Klee that I have seen, but there may be some good ones floating around out there. However, there are some great internet resources, including this video for grade school kids, and this slide show for any age. You can catch my Periscope about these projects and my thoughts on instruction vs. creativity here. Great art, math and music tie ins - you can't go wrong with Paul Klee!

Sunday, August 30, 2015

Super Cute Felt


During a web library search for a different felt book, I stumbled upon Super-Cute Felt Animals by Laura Howard and thought I'd give it a try. The patterns are simple, very simple, but that makes for perfect beginning sewing projects for kids. The animals are also small, around four inches on average, which makes them super quick to finish - another bonus when sewing with children! My eleven year old is learning to hand sew this year, so we worked together on a few projects from the book:


and here are the fish and the whale on this month's nature table:


If you have even moderate sewing experience, you may find this book a little disappointing. These designs have a single front and back piece, which makes them essentially flat, even when stuffed. For felt animals that I plan to sew for the little guy, I'm using slightly more complicated patterns from another book. That said, I have enjoyed working on these projects! They are super fast, as in whip one up after breakfast for play time that morning fast, and my son can complete one without getting frustrated. They would make cute ornaments or backpack friends, and although I could draw up the patterns myself, it is so much more convenient to trace or photocopy them and hand them off to be completed by the next available child. I would definitely give this book a whirl if you have a beginning sewer and can find it at your local library.

Monday, August 24, 2015

Guest post at Waldorf Essentials


I have a guest post today about planning for the school year over at the Waldorf Essentials blog. Please pop over and check it out!

Sunday, August 23, 2015

Dangerous Things


I spent an afternoon binge listening to the NPR TED Radio Hour podcast while I sorted through our bookshelves and homeschooling supplies recently.  If you've never heard them, you must subscribe; seriously, do it right now. You won't regret it. For the podcast, they pick a theme, then play portions of TED talks which relate to that theme, and also interview the presenters. A talk, 5 dangerous things you should let your kids do, caught my attention. Granted, the notion that you should allow your children to take risks or try activities that might not be approved by the AAP is not a new idea, but this talk sparked a little more reflection than usual on my part. The older kids were spending a week with their grandparents, and during a FaceTime call my son showed us the sewing machine he had just made a project on. My first reaction was surprise and a little thrill, since he really enjoyed sewing (hooray!). My husband's first reaction was something like, "Wow, be careful using that." He saw danger. I did not.

The next day my father in law called to ask how to cook the allergy friendly mac and cheese I sent up. After talking him through the steps I mentioned that Madeline could help, since she had made it before at home. He noted his concern about boiling water. He saw danger. I did not.

While camping, my husband taught Max how to make a camp fire. He let him build it, feed it and stoke it. It was a pretty big fire. I saw danger. He did not.

Upon reflection, I realized how intimately connected the risk we allow our kids is intertwined with our own feeling of expertise. My mother in law and myself are completely comfortable with kids using a sewing machine because we both sew. I sewed on machines at ten years old. I started cooking around that age, too. Baking actually - from scratch, the whole nine yards. So I feel comfortable with teaching my kids to use the stove and oven. My father in law, and my husband for that matter, see the risk, because they are not comfortable in the kitchen. Just as I saw the risk with the camp fire, which is not part of my responsibilities when we camp.

Of course, now the question becomes how do we get comfortable with risks that are outside our areas of expertise? Oh, that is the catch, isn't it? How did my mother feel comfortable with me using the oven when she'd never made a cookie from scratch in her life? While I'm pretty good at letting my kids use tools and appliances to create what they wish, I'm much more protective with physical risks. Climb that towering tree? Jump off of high places? That's much harder for me to approve. And yet we know that's exactly what we should be doing, within reason. We should be allowing for wings to expand, for space to explore, for challenges that just might cause injury, but definitely will cause pride and a sense of accomplishment.

It's still an open question for me. I am making more of a conscious effort this year to allow more risks in areas I feel comfortable with (more sewing!!!) but also encouraging my husband to expose the kids   to things he feels confident in (power tools, anyone?). And those dangerous things that scare me? Well, for now, once in awhile, I will try to smile and say, "sure, but be careful." Try.

Do you allow your kids to do "dangerous things"?

Tuesday, August 18, 2015

Not Back to School


Well, it's that time of year again, when we homeschoolers don't go back to school.  We started our day with a walk to the park, and unfortunately, the timing was just wrong on this shot so I didn't capture their sweet hand in hand stride.


Both kids are starting off with sound for physics this year, so our first board went with the poem by Rumi, "The Breeze at Dawn."


Alex got his own board to match the ocean theme of his nature table this month. We have been making little felt creatures to go with it, but more on that in the next post.

Two days in and we all survived. It's a heavy academic year, with both kids in middle school, and the planning this summer was tremendous. I know it will pay off, but I have to admit that I am somewhat mourning the loss of my last month of summer! It is fantastic to be back in that learning rhythm. I do like having more structure to the days, and that sense of accomplishment when items are checked off of the to-do list. The school rhythm is a work in progress, as right now I only have academics scheduled. I'll be using the next two weeks to figure out where to add in form drawing, handwork projects, exercise for the kids and piano. Yes, form drawing in middle school. We haven't done much of it, since we came to Waldorf late, but I think both kids could still benefit from it, especially to improve handwriting. Madeline enjoys it; she says she finds it meditative. Isn't it fantastic when they unexpectedly express exactly what is supposed to be happening on a deeper level? Then you really know this "crazy" Waldorf stuff is working!

Friday, December 6, 2013

Lego Geometry - Circles


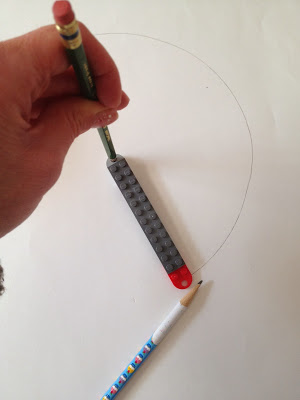
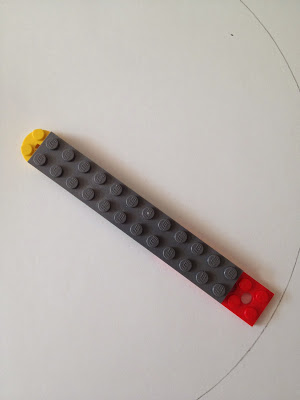
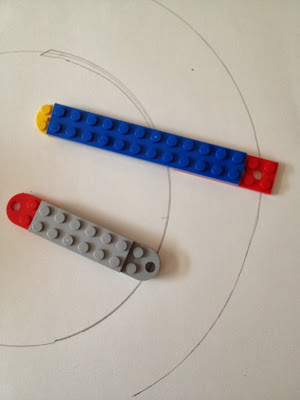
Circles from rectangular building blocks? Am I crazy? No, I did not give the kids the task of creating circles from Legos, but we did create tools from Legos to make circles! The bricks pictured above are the ones we found in our collection that worked the best, but sort through yours and see what you can find.


Our favorite compass consisted of a long rectangular flat block with a half circle piece at each end (the kind with the holes). To make a circle, secure the compass at one end with a sharp pencil, then use a second pencil through the other hole to trace your arc. It helps if you tape the paper down first or have somebody hold it.


Flat pieces that have holes in the center also work well. The circular piece needs a very sharp pencil point as only a small portion shows.


The kids experimented with different sized pieces to make smaller and larger circles. We discussed pi and they measured diameter and radius, as well as calculating circumference. Who said Legos can't make circles?


Sunday, October 13, 2013

Lego Geometry - Triangles and Polygons


After learning about the different types of angles, building them with Legos and measuring the tracings with protractors, we moved on to triangles and polygons. It's a pretty easy leap to take your Lego angles and add a third piece to make a triangle.


Easy in theory, yes, but in reality it can be difficult to find a third piece that is just the right size. Make sure you have as many pieces as you can scrounge out of those Lego bins for this activity, and remember you are looking for the shape inside the Lego, not around the perimeter. You would have a pretty wonky triangle if you tried to trace the outside, but look how nice they come out when you trace inside! We classified our triangles by sides ( equilateral, isosceles and scalene) and angles (right, acute and obtuse), then the kids traced examples of each in their math notebooks. You could also measure the angles of the triangles you traced with your protractor.


Break out those double row bricks for polygons, and of course you can use your single rows as well. The kids had fun combining different bricks to make some wild polygons. A polygon is a multi-sided  two dimensional figure made up of three or more line segments, so you can really go to town with building these shapes. We started out with traditional shapes such as squares and rectangles, then moved on to more creative builds. Since these were rather large constructions, the kids drew their examples instead of tracing them.

The real challenge is coming up next time - circles!

Tuesday, October 8, 2013

Lego Geometry - angles


Math is not a favorite subject for either of my children, even though it comes so easily to Max. I am always looking for a way to make it more fun, more appealing, and nothing is more appealing to my kids than Legos. So, when we started a geometry unit, I thought it would be a perfect pairing. I sorted through the Lego baskets and pulled pieces that would work well with line segments and angles, our first lessons. I mostly selected the thin, single row Legos you see above, in different lengths. I introduced the concept of lines and line segments using the pieces, then we made parallel and perpendicular lines using the bricks.

Taking those line segments and perpendicular lines, we snapped them together (or pivoted them, in the case of perpendicular lines) to create angles. We opened them to different widths to show acute, right and obtuse angles.


We traced them in our math journals and labeled the three different kinds of angles. You need to trace the inside of the angle, not the outside. It also helps if someone holds it, because they have a tendency to shift on you while you are tracing!


The next day I told the kids to create five different angles and trace them in their notebooks. I expected that they would make five individual angles, but they both surprised me with their approach. Max made one angle, then just pivoted it to create different degrees. Madeline took the right brain approach and created the structure on the right, then laid it in her notebook and traced the different angles it creates. I love their creative problem solving!

Thursday, September 19, 2013

Eggshell Geodes

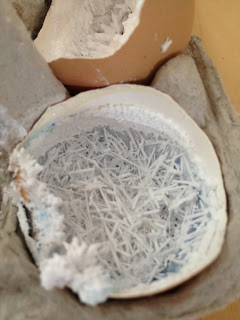
This has to be one of my favorite science experiments! We have made crystals in different ways, but the crystal formations from one method we tried was just amazing.

Directions for these "geodes" can be found all over the internet, and these are made from Epsom salts and water.  The photograph above shows the results of two different curing methods. The carton on the left was grown in the refrigerator. The one on the right was left in the kitchen window to dry out. These pictures were taken a couple of months after we made them, so the original color has faded somewhat.

The refrigerator method gave much larger, more impressive crystals. For both batches we used these basic instructions. On another blog I read the idea of putting them in the refrigerator to crystalize, but I'm afraid I can't remember what blog it was. Another hint I read from the unnamed blog was to make sure you have a good slurry. It's the slurry you want in your shells, not the thin top liquid.
Here is a close up of the air dried version. The crystals were much finer, and sparse. It actually took about a week longer for the liquid to dissolve in the air dried shells versus the ones in the fridge!

It's a simple experiment, calling only for a few ingredients and about ten minutes of actual work time. I had been saving eggshells for a few weeks prior, rinsing them and letting them dry in the kitchen window. The fun came in watching the crystals emerge over the next two weeks. 

Monday, September 16, 2013

Review Rings


We are starting to find a comfortable rhythm for this school year now, so for the next couple of posts I will be sharing some of our strategies and creative lessons that we have planned for the year. I have always incorporated review into our plans, but I can't say that the kids rejoice over worksheets. I wanted to include systematic review this year, since we deal with attention issues around here, but I didn't want it to be cumbersome for me or the kids. The review rings were born. 

They are exactly as they sound - review cards on a binder ring. I started out making them from cut up old worksheets and textbook pages, with some flash cards thrown in for good measure. I then added some hand written cards that touched on topics from social studies, science, and the literature we have read. Of course I pulled out my trusty laminator so I could reuse the cards during the year and for the little one in the future.


There are only a few problems per card (sometimes only a single question), so the kids don't find them overwhelming. The wipe off factor seems to help, too. For some reason, using a wipe off pen seems less burdensome to my two students than a pencil. They are part of their daily independent work time. My goal is to create a few more each Sunday, covering what we learned the previous week.

I covered a baby shoebox with scrapbook paper to make a home for the cards. I added dividers by subject, and I simply file the ones they have completed in the back of each section. I don't keep track of which cards they have completed because it is review, after all. If they get the same math card again, that's fine with me. Practice never hurts.

Alex thought those cards were pretty cool, too, so he got his own set. I found some adorable color and number flash cards at Mr. Printables. If you have never been there, you must check out his site. It is fantastic. The Dollar Spot at Target also had some great photo and Dr. Seuss flashcards, so now the baby has more cards than the kids! He very much enjoys dumping all of the out of his box and spreading them around the floor. I wish he also enjoyed picking them back up!


Monday, January 30, 2012

In our homeschool, games are a regular part of the curriculum. With an ADD daughter and a son who dreads math worksheets, games are a fun way to liven up a sometimes dull subject. I was inspired by this marble arch game on Pinterest, but made a few changes to make it more versatile.

I used a whole box, minus the lid, so the marbles wouldn't run everywhere. The top and sides are covered with scrapbook paper, because I'm lazy and didn't want to wait for two or three coats of paint to dry. I painted the front with chalkboard paint (sigh, how I love chalkboard paint!), so I can change the numbers depending on what each child is working on. For the example above, you shoot two marbles through the arches and then multiply the numbers. Of course you could add, subtract, or divide the same way. But why stick with whole numbers? You could use fractions, decimals, or negative numbers. You could play with fraction bars, so the child collects the corresponding fraction bars until they have made a whole. You could use pattern blocks to practice geometry and/or cover a pattern block card with a design. You could use coin amounts and have the child collect the corresponding coins until they reach a dollar (or other specified amount). I love having wipe-off games that I can customize to whatever skill is needed!

Monday, November 14, 2011

Candy Science

We don't eat much Halloween candy around here. First of all, Max can't eat any of it, and since I don't usually buy candy, the kids usually forget about eating it after Halloween. Instead, we do science projects with it. Last year, we made models of molecules, and this year we had two days of experiment mania. Most of our ideas came from the Candy Experiments website. We messed around with density (a huge hit), looking for the floating "s" from Skittles, tested for acid, and melted lots of different candies in the toaster oven.
Before we broke out the beakers I had the kids sort their candies and record the data, then decide on broader categories to put them in and graph the results. Who knew you could get so many lessons from Halloween treats?

Sunday, October 16, 2011

Museum Scavenger Hunt Book

We have several museum trips coming up, thanks to free and reduced homeschool days, and I love using scavenger hunts to help focus the kids' energy when we are there. However, I do not love carrying a clipboard around, or trying to write against a wall or knee, or searching through the backpack for a pen. My solution? A book! I printed pre-made scavenger hunts from the Monterey Bay Aquarium website (many museums have them listed under the teacher resources, or you could make them yourself from pictures from the website) and bound them in a sturdy chipboard book, sort of following Angry Chicken's directions here. Instead of stapling the pages together, I folded each page in half and glued them back to back. Then I glued the first and last pages to the covers which made end pages and at the same time, secures all of the pages to the book.
This allowed the whole page to fold down for viewing, and the floating spine enables you to fold the whole book backwards. The hard chipboard covers (I took mine from the back of a sketchpad) provide a perfect surface for writing.
To keep track of the elusive pen, I added an elastic loop between the back page and the cover. To add extra hold insurance, I glued it down and then covered the edge with gaffer's tape.
That's all there is to it! Now I have a pint sized book of fun to focus our attention and our energy, and maybe discover something we hadn't noticed before. Now if I could only make our lunch bags and water bottles pint sized...

Thursday, September 8, 2011

Mystery Box

My new comprehension tool - the mystery box. This is slightly different from the learning kits I have been putting together, as you can change this one from day to day.
I used an old Math U See box and painted the top with chalkboard paint.
I filled the inside with items related to the Phoenicians, the section we were about to read in our history book. I had the kids inspect the items, and told them they needed to figure out how they related to the Phoenicians. This made them listen closely to the chapter, then use their critical thinking skills to figure out how the items were connected to the passage. It also helped my visual learner process the information in the book. The best part is that I can erase the title, fill it with something else, and use it again tomorrow!